Would you like to give your rugs an aesthetic and durable finish? You can do it with a 15 cm sturdy rug sewing needle!
Come, let me show you how!
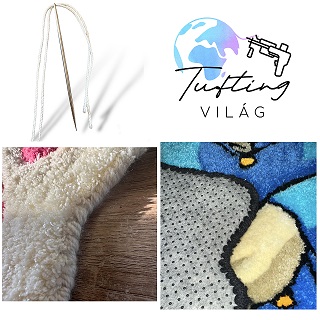
Give your rugs an aesthetic and durable finish with a 15 cm sturdy rug sewing needle
Would you like to give your rugs an aesthetic and durable finish? You can do it with a 15 cm sturdy rug sewing needle! Tufting not only provides a way for creative expression but also results in a finished product that retains its beauty over time. In this blog post, I'll show you how to use this essential tool to enhance the aesthetic appeal and durability of your handmade rugs.
The Importance of Finishing
When it comes to making rugs, the finishing touches can significantly impact the appearance and durability of the final product. A well-finished rug not only provides a professional look but also prevents the edges from tearing and unraveling over time. The sturdy rug sewing needle plays a key role in this process, allowing for precise stitching that contributes to the rug's aesthetic appearance.
By using a 15 cm rug sewing needle, you can work with thicker yarns and create various textures, giving your rugs a unique and refined appearance. Let’s take a step-by-step look at how you can achieve the perfect finish!
Preparing for the Project
Before you start, gather all the necessary materials:
- 15 cm sturdy rug sewing needle: This will be your main tool for sewing.
- Yarn: I recommend 100% wool yarn because it is durable and looks aesthetic. A 400-gram package is sufficient for most projects.
- Threader: For threading the needle.
- Scissors: To cut any excess material or yarn.
- Finished rug
Step-by-Step Guide to Tufting Finishing
-
Trim the Finished Carpet We typically sew around the carpet after trimming. Start the edging by trimming the canvas. Leave about 0.5 centimeters along the edges and cut the base canvas from the carpet already adhered with backing. The approximately half-centimeter allowance facilitates easier stitching since we won't be piercing the yarn but rather the glued primary cloth + backing material + optional polypropylene backing (for firmer support).
-
Choose the Yarn Color For a professional finish, it’s recommended to use yarn that matches the carpet's edge color. Black yarn can also be a great choice for a classic look. Choosing the right color ensures your stitching blends seamlessly with the carpet, giving it a clean appearance.
-
Thread the Carpet Sewing Needle After preparing the carpet and selecting the yarn, it’s time to thread the solid carpet sewing needle. Measure out two equal lengths of wool yarn that are comfortably manageable for you. For us, this is about 2 meters long. Use the threader to thread both strands of wool yarn through the needle's eye, one at a time. This may take some practice, especially with thicker yarns. Once both strands are threaded, pull them to the center of the needle. There’s no need to knot the ends.
-
Start Edging Begin sewing the edge of the carpet with a simple whip stitch. As you work, be careful not to pull the yarn too tight. If pulled too tight, it can bunch the carpet and prevent it from lying flat. Your goal is to maintain even tension, allowing the yarn to fit comfortably into the material without causing distortions. The total of four strands of wool yarn is about 1 centimeter wide. It's important that when you pull, the four strands lie side by side, smoothed out, rather than on top of each other (which would create a knotty effect).
-
Continue Around the Carpet Keep sewing around the perimeter of the carpet, following the shape or curve as needed.
For a 1-meter-wide carpet, I typically use about 80 grams of yarn for the edging. For smaller carpets, around 40 grams is sufficient. Adjust the yarn usage based on the project’s size, ensuring you have enough for finishing.
If you run out of the trimmed wool yarn, or if the needle can no longer pass through, simply cut the yarn and thread it back through the last 1-2 loops, then pull tight and trim the excess.
For new threading, start with the last stitch.
Additional Tufting Tips
- Moving the Needle Side to Side: If too much glue has been applied to the edges of the carpet, it may be harder to pierce through with the needle. In this case, it helps to move the needle side to side as you pierce the carpet.
- Practice Patience: Tufting requires patience and precision. Take your time to ensure each stitch is placed accurately and the tension is correct.
Conclusion
Finishing carpets with a solid carpet sewing needle is a rewarding experience that adds beauty and durability to your work. With the right techniques and materials, you can achieve a professional result that will impress anyone who sees your work.
Are you ready to enhance your carpet-making skills? Gather your materials, grab your 15 cm carpet sewing needle, and unleash your creativity! Happy tufting!
Join Our Community! If you want to learn more tips and tricks or share your projects, join our Facebook group, Tufting World! Feel free to ask questions, share your work, and connect with other tufting enthusiasts.
You can also find us on Instagram and TikTok for more inspiration and guidance. Let’s tuft together for beautiful creations!